The Enchanters Retreat
Greetings, wayfarers.
This adventure marks a shift in system focus, as I’ve been experimenting with Worlds Without Number—a lighter framework with fewer assumptions baked into its setting and mechanics.
This dungeon is the result of that experiment.
If you find it useful, entertaining, or worth running at your table, then I consider it a successful test. I hope you enjoy it.
What You’ll Need
- Free rules for Worlds Without Number (or the Free SRD)
Background
The great tower of Caer Aelthryn looms over the landscape like a bony finger, pointing skyward from the center of a nearly impenetrable thicket. Once, Caer Aelthryn was the seat of a hobgoblin warlord who fancied himself high fey. His realm splintered upon his death, leaving only the bloodstained thicket and the tower around which he built his castle. The warlord never uncovered any secrets of the tower or the labs beneath.
Long before the hobgoblin warlord’s reign, the tower was built by the Sidhe wizard Thaelir Moonspire during the Second Age, when magic returned to Domhannau. Thaelir, a renowned arch-enchanter in service to one of the lost ancient fey realms, was famous for illusions so lifelike they could mislead armies. He also excelled as an artificer, crafting magical devices within his labs.
During Thaelir’s lifetime, he was a notorious recluse. He built his tower amid an inaccessible thicket to keep visitors away. To further protect his solitude, he designed his tower without stairs, requiring flight to move between levels. He filled the thicket with a variety of traps and tricks. After Thaelir’s fall during the cataclysm, his formidable defenses kept the tower untouched for over a million years. Only after all this time did the hobgoblin warlord briefly lay claim to the ruin.
About 3 weeks ago, the Ashmaw orc tribe moved into the castle ruins to seek a safe winter refuge. Most young tribe members were away working as mercenaries. Defense was their priority.
Shortly after the orcs arrived two weeks ago, Ezuqirax the Dark appeared with his skeleton entourage. Mistaking Thaelir for an arch-necromancer due to a mistranslated tome, Ezuqirax now seeks the archmage’s spellbook, convinced it holds necromantic spells. After a brief skirmish with the Ashmaws, Ezuqirax began excavating Thaelir’s old labs beneath the tower.
Two days ago, the wyrmling Bryreoss arrived with his entourage and his baby sister. Bryreoss seeks a powerful magic orb that Thaelir created long ago. The orb is supposedly capable of creating breathtaking illusions on a grand scale. Bryreoss believes it is a perfect birthday gift for his mother. If not, it will make a remarkable addition to his own collection.
Currently, a standoff persists. The Ashmaws lack manpower for a counterattack and survive by trapping rodents. Ezuqirax ignores the orcs but is low on food and reagents. Bryreoss waits for the skeletons to excavate, growing anxious as his mother’s birthday nears.
Paxton’s Crossing
Paxton’s Crossing is larger than most backcountry dominions in the Silver Highlands—large enough for a general store, a church, an inn, and even a schoolhouse. Yet despite these amenities, it remains remarkably young, barely a few years old. The town began when several stray patches of northern New Hampshire and Vermont were swept into the Feengrenze during a dead-of-winter whimwhirl.
Against this backdrop of new beginnings, the local headman, former general store owner Arthur Paxton, fancies himself both a baron and a hospitality mogul: the former because he controls the only meaningful stockpile of offworld ammunition for miles around, and the latter because he has commandeered several abandoned vacation homes and converted them into hunting lodges for the rich and powerful.
Consequently, Paxton’s attempts to market the Crossing as a holiday destination have met with mixed success, owing largely to his complete lack of sophistication or tact. Nevertheless, the settlement continues to prosper thanks to its location along Yorkchill Beck, fertile land nearby, and steady profits from logging and trapping.
Rumors in Paxton’s Crossing
- Nobody has been able to loot Caer Aelthryn; many have tried, but they cannot get through the thicket.
- Caer Aelthryn was once the seat of a hobogoblin king, but his death brought his realm low.
- The castle was built around an ancient wizard tower belonging to an archmage.
- The archmage who built the tower was a necromancer (F)
- There is supposedly a vault filled with treasure in the castle cellars
- I heard that someone spotted a dragon flying around a few days ago. It flew towards the Caer Aelthryn.
- The Aelthrynian Thicket is filled with undead(F)
- Some orcs were spotted around the Aelthrynian Thicket a few weeks back, a sign of war if I even heard of one.
- The mage who built the tower in Caer Aelthryn supposedly made wondrous magical tools.
- Skeletons have been seen roaming the valleys near the Aelthrynian Thicket
The Aelthrynian Thicket
The Aelthyrnian thicket is an 18-square-mile bramble-choked valley 10 miles north-northwest of Paxton’s Crossing and surrounding Caer Aelthryn.
The forest has an unfair reputation for evil. After the hobgoblin warlord who built Caer Aelthryn died, the thicket became the battleground for the civil war that destroyed his legacy. Eight generations later, feyfolk recount tales of massacres in the brambles. They spread legends of blood-soaked soil and ghouls in tangled woods. Most stories are bunkum, but explorers sometimes find fey warrior skeletons among roots and brush. The woods hold illusion traps and tricks set by Thaelir.
The briar is so thick and tangled that nothing bigger than a badger can live there comfortably. The main danger is getting lost or stumbling into a trap. The valley’s dense underbrush requires a DC 10 Survival/Wisdom or Survival/Intelligence check, or three days of clearing with machetes and hatchets. On a successful check, they find a path to the foot of the ca
| 1d10 | encounter |
| 1 | They encounter a pitfall trap disguised by illusion magic. The trap can be detected either through a mental save or by carefully prodding the ground |
| 2 | They stumble into a deer snare set up by the Ashmaw orcs. |
| 3 | The players find an illusory trail that seems to lead to the tower, but actually leads them back out of the thicket. If any of the player characters succeed on a mental save, they realize the path is leading them away from the tower |
| 4 | The players encounter a group of orc children with small bows, arrows, and small game on wooden sticks. They flee towards Caer Aelthryn. |
| 5 | The players encounter a very convincing illusion of a massive, dangerous beast that gives chase. If a player character succeeds on a mental save, they see through the illusion |
| 6 | The players encounter a hidden group of kobolds. There is a lot of rustling in the thicket, but they do not see anything. They are either hunting for meat for their master or observing the players. They will run and hide if approached |
| 7 | The players encounter a trap that conjures 1d8 illusory goblin soldiers with spears and bows. The soldiers cannot hurt the players, but they are persistent. The player characters must make a mental save or be hit by one of the goblin’s attacks to realize that the soldiers are illusions |
| 8 | The players encounter a trap that emits a dazzling, mesmerizing light display. If they trigger the trap, the player characters must pass a mental save, or they will spend 1d3 hours sitting stupefied, watching the illusion |
| 9 | The players find an abandoned but suspiciously well-stocked campsite. It is an illusion. Everything the players see is illusions covering a pile of rocks and thorns. If the player characters succeed on a mental save, they see through the illusion. Otherwise, if they spend a night at the campsite, they get no benefit from sleep. |
| 10 | The players encounter recent footprints belonging to members of one of the dungeon’s factions |
Caer Aelthryn
Breaking through the choking briars, you stand at the foot of a ring of rubble about 150 feet round. Not much is left of the structure except a single tall, slender, and impossibly smooth white tower and a large hall. A few small trickles of smoke can be seen rising from the hall’s wall. The center of the ring is filled with debris, smashed tents, and broken weapons.
Tower: The tower stands six stories tall, windowless, and seemingly untouched by time.
- A closer look reveals the tower is not truly smooth—faint, hair-width lines curve across its surface, each line perfectly even and deliberate.
- Any mage who touches the tower realizes the lines are plate-sized characters in the runic tongue of faerie.
- The runes form a magical working preserving the tower since the Second Age’s fall.
- There is a single door at the base of the tower. It is a section of the wall that swings open, located roughly half a diameter away from the player around the tower. The door is currently ajar, with many fresh three-claw footprints coming and going.
Hall: The moment the players get within 20 feet of the gap in the hall’s wall that serves as the hall’s entrance, they hear a challenge shouted at them in orcish. Two adult orcs appear to fill the gap with greatswords, and two more in the windows with javelins cocked.
- The orcs will repeat their challenge to the players in different languages until the players respond.
- They demand to know what the players are doing here.
- If the players convince them they mean no harm, the two with javelins escort them to Bulaka Swordfist.
- A DC 8 notice check reveals the following (one item per check)
- The orcs look like battle-scarred veterans by their gear and weapon handling.
- The orcs are jumpy, nervously twitching as if expecting a frontal assault.
- They also appear gaunt, as if they had been underfed recently.
Debris: The area holds countless broken weapons, torn tents, and many shattered bones without rot. These fall into two groups: snapped arrows, discarded halberds, greatswords, and torn tents on one side; broken bones, longswords, shields, and shattered javelins on the other.
Hall
The ruined shell of the hall is packed tight. Improvised shelters, bedrolls, and cookfires crowd the space. Orcs, mostly women, children, and the elderly, huddle around these small comforts, eying you warily with hands twitching towards knives and spears. Many have bandages on their limbs or jagged scars on their arms or faces. At the far end of the hall is a tent.
Orcs: There are 4d12 orcs in the camp, none of fighting age or fit to fight. If escorted by an on-guard orc, the camp’s occupants will not attack. Otherwise, they grab weapons and defend themselves, only attacking if threatened.
- A DC 6 notice check reveals that many of the orcs are suffering from the same gauntness affecting the guards, except for the children.
Shelters: Searching the shelters reveals only clothing, simple weapons like javelins, and small personal items. There are noticeably more clothes than orcs present in the camp.
Tent: The tent is barely large enough for the players and its occupants: acting chieftain Bulaka Swordfist, a muscular one-handed orc woman near the end of childbearing years, and two prepubescent orc children. She wears a black metal prosthetic over her hand stump.
- Bulaka uses the stat block of a knight with a greatsword.
- If escorted with guards, she greets the players with guarded hospitality.
- She explains that the tribe is here to spend the winter safely while the youngbloods seek work. A week ago, a necromancer and skeletons stormed their camp and drove them into the hall before entering the dungeon. Many died, including her husband; their corpses were taken. Since then, they have survived on what the children catch.
- Bulaka wants to drive the necromancer from the dungeon and recover her husband’s body, but the tribe lacks enough fighters. If the players kill the necromancer, she will reward them with her husband’s old +1 devoted greatsword, currently kept in her tent.
- She explains that the tribe is here to spend the winter safely while the youngbloods seek work. A week ago, a necromancer and skeletons stormed their camp and drove them into the hall before entering the dungeon. Many died, including her husband; their corpses were taken. Since then, they have survived on what the children catch.
- The tent holds the chieftain’s remaining possessions: a +1 devoted greatsword, 100gp, personal belongings, and a collection of prosthetic hands.
The Tower:
First floor Foyer
The first floor of the tower is a vast circular chamber of smooth white stone, approximately forty feet in diameter. The ceiling arches nearly fifteen feet overhead, forming an unbroken dome.
Strange spiraling patterns are carved across the walls from floor to ceiling, twisting and looping so densely that staring at them too long makes the eyes ache.
A perfectly circular shaft, about ten feet across, opens in the very center of the chamber floor and descends straight down into darkness. A sturdy wooden ladder leans against the edge of the shaft, providing access downward.
Strange pattern: The walls are covered with spiraling engravings in the stone.
- Hidden in plain sight within the pattern are runes to power a spell of illusion. A dc 10 notice check is required to spot them.
The shaft serves as the only visible exit from the chamber. It is 25 feet down from the rim to the dungeon floor below and is the main entrance to the lower levels.
- The ladder was brought by Ezuqirax and is made of sturdy oak timber.
The ceiling is a large illusion hiding the shaft to the upper floors. Any effect that dispels magic or probing with a pole or thrown objects reveals this fact. Alternatively, defacing the runes hidden in the pattern will disable the effect.
Defacing the hidden runes also disables the effect.
Shaft: A shaft 6 stories tall, lit by glowing crystals, rises above
- No traces suggest the room ever contained furniture, stairways, or accommodations for non-flyers.
Floor two: the dining room
You step into an opulent dining chamber fit for royalty.
A massive banquet table dominates the room beneath glittering chandeliers. Gold-trimmed furniture, polished exotic woods, crimson drapery, and ornate silverware gleam in the warm light.
Yet something feels subtly wrong. A faint haze hangs across the room, blurring the edges of everything except for the large chair seated at the head of the table.
Illusion: Everything except the chair is a magical projection. In reality, the room is bare, with concrete-like stone walls and no decorations.
Rune circles: There is a circle of runes on the floor, hidden by the illusion
- Any mage or player character with at least one point in magic identifies the writing as the runic tongue of faerie and that it is likely a spell.
- A DC 10 magic check allows a PC to determine that it is the working replica of the Phantasmal Mimesis spell.
Chair: The chair is well-worn and shows signs of regular use, though less so than the chair in the Enchanter’s Kitchen.
Floor three: the bathroom
Warm, fragrant steam fills the chamber.
A massive stone bathtub dominates the room beside an equally enormous washbasin, both filled nearly to the brim with perfectly clear, steaming water. The air smells faintly of flowers, herbs, and clean rain.
In the far corner stands a tall stone cabinet coated in a thick layer of dust.
Basin and Tub: Both are nearly full; the tub could fit all of you.
- Touching the water confirms it’s the perfect temperature for bathing or washing.
- The water is enchanted to remain clear and fresh, no matter what the players do to it.
Cabinet: The door opens easily, revealing a dusty interior and bottles.
- The Players have no way to know this, but the dust used to be towels of various sizes.
- The bottles are all labeled with engraved labels in the Runic tongue of Faerie.
- Most of the bottles in the front are empty, and the labels simply say “bath salts” and “liquid soap.”
- The sealed bottles (1d12) in the back have fancier writing and contents, apparently never used.
- The bottles and their contents are each worth 10m each.
- One bottle is labeled as being Thaelir’s Ultimate Noble Bath Experience and promises some pretty unbelievable results.
- The bottle is actually a prank by Thaelir on any unfortunate guest staying at his place. Opening the bottle summons a water elemental instructed to “wash” the opener while Thaelir watched through a scrying device embedded in the ceiling.
- Upon opening, the elementals grapple with the opener and try to drag it to the tub, where it will repeatedly clean the opener with the gentleness of a tornado until Thaelir instructs the elementals to stop.
Floor four: the guest room
You step into what appears to be a luxurious guest suite — at least partially.
Half the chamber features velvet curtains, polished wood, soft carpets, and a grand four-poster bed draped in fine fabric.
The other half is bare: smooth pale stone, dusty floor, circular smudges, and crumbling owl pellets scattered about.
The boundary between luxury and emptiness cuts directly through pieces of furniture, leaving half-visible chairs and sliced bedposts fading abruptly into naked stone.
In the center lies the decayed remains of a massive nest made from branches, leaves, cloth, and paper.
Beyond it, a narrow crack in the outer wall reveals a sliver of open sky.
Illusion: The illusion perfectly covers half the room, making everything appear, feel, sound, and smell real and luxurious. However, all items created by the illusion are intangible and cannot support any weight, although those affected by the illusion perceive them as solid and will insist otherwise if questioned.
- Nothing conjured by the illusion supports weight—any attempt to sit, lie, or place objects will result in them passing through, yet those under the illusion’s effect will be convinced they are interacting with real, solid furniture.
Smudge marks: Rings roughly 1 foot around dot the bare side of the room.
- They form a pattern suggesting missing furniture and walls.
Nest: The long-abandoned nest smells of mold, feathers, and animal musk, built from crumbling branches, rotted cloth and paper, and large feathers.
- Touching any organic material causes it to crumble.
- A DC 8 know check will reveal that the nest was probably created by a giant owl and has long since been abandoned.
- Pages are written in runic and contemporary Faerie; most are woven into the nest’s top, as if someone were reading them.
- Modern pages chronicle Aelthryn’s reign in dry detail.
- Runic pages read like diary entries.
- Reading any runic entry fully reveals that it is Thaelir’s diary.
- The diary reveals Thaelir as self-absorbed, valuing only those who advanced his goals or entertained him. He details elaborate, cruel illusions played on guests and nearby towns purely for his amusement.
- Later entries record Thaelir’s obsession with Princess Caoilfhionn, including schemes to pursue her, despite the immense age difference.
- Reading any runic entry fully reveals that it is Thaelir’s diary.
Crack: An L-shaped crack, 7 feet high by 6 feet wide, marks the wall opposite the door.
- The crack outlines a sidhe door.
- It opens with a gentle push.
Floor five: bedroom
The ravaged remains of what was once an opulent bedchamber await any who enter.
A massive canopy bed lies in ruins, splintered frame and gutted mattress surrounded by deep claw marks on the walls and floor. Wallpaper hangs in strips, carpet shredded in dusty heaps.
A large wardrobe sags against the wall, one door hanging loose from rusted hinges.
Amidst the destruction, only a single thing remains untouched:
A large portrait of a stern sidhe wizard glowers down at the room, as though personally offended by any intruder’s presence.
Wardrobe: The wardrobe is rotten, with the wood crumbling to the touch. One door hangs almost completely off its rusted hinge, barely attached.
- Opening the wardrobe releases a flock of moths that swarm the room before flying away out the open window.
- Inside the wardrobe, most outfits are reduced to tattered scraps by age and moths. One garment remains: a cloak of many patterns, which appears untouched by decay.
- Cloak of Many Patterns: A high-collared robe. As a bonus action, the wearer can instantly change their color and pattern to any design or color they can imagine.
- Inside the wardrobe, most outfits are reduced to tattered scraps by age and moths. One garment remains: a cloak of many patterns, which appears untouched by decay.
Carnage: Jagged tears mar the furniture and walls alike, evidence of something violent.
- A character who makes a DC 9 Knowledge check determines that whatever wrecked this place was some sort of large bird.
Painting: This large portrait depicts a sidhe, dressed in a high-collared purple cloak and a matching turban adorned with a large feather and a diamond set in a gold frame—the subject glowers, appearing annoyed by any viewer’s presence.
- The painting depicts Thaelir; the players have no way to determine this.
- The painting is worth 10gm as is or 20gm if they can identify the subject.
- The painting is enchanted to prevent theft. If touched by anyone other than Thaelir, it deals 1d4 shock damage and blinds the toucher for 1d10 minutes.
Floor six: observation room.
The shaft opens into a vast circular chamber.
Towering windows line the walls from floor to ceiling, revealing breathtaking views of distant mountains, forests, rivers, and endless skies rendered in impossible clarity.
Yet the room itself is almost empty.
A single plush chair sits alone in the center of the chamber, facing the false panorama.
Dust gathers across the pale stone floor, though the chair itself appears remarkably well-preserved, its cushions worn with long use.
Windows: These appear as towering glass panes but are, in truth, highly detailed illusions projected onto smooth concrete walls, simulating panoramic vistas with impossible precision.
Chair: The center chair is upholstered in faded, luxurious velvet, with richly carved wooden arms and legs. Its surface is plush and inviting, showing patina from years of use.
It shows evidence of being well-used.
- Sitting in the chair creates several more illusions, each depicting an overgrown ruin with no indication of its exact location. The presence of treasure in these locations is merely suggested, shrouded in ambiguity.
The Dungeon
Illusionary Doorways
Thaelir hid many important chambers using powerful illusion magic. These doorways look like ordinary walls, with fake textures, temperatures, hardness, and even faint echoes when tapped.
The illusion tricks all five senses and subtly manipulates observers’ perceptions. Creatures affected by the illusion instinctively avoid fully testing the wall, shifting away before noticing anything unusual.
A character brushing or leaning lightly against the doorway feels solid resistance. Creatures forcing through, pressing firmly, or testing the wall discover the illusion at once.
Young children ignore these illusions and see the hidden doorways clearly. Furthermore, the illusions do not appear in reflections.
Tigi
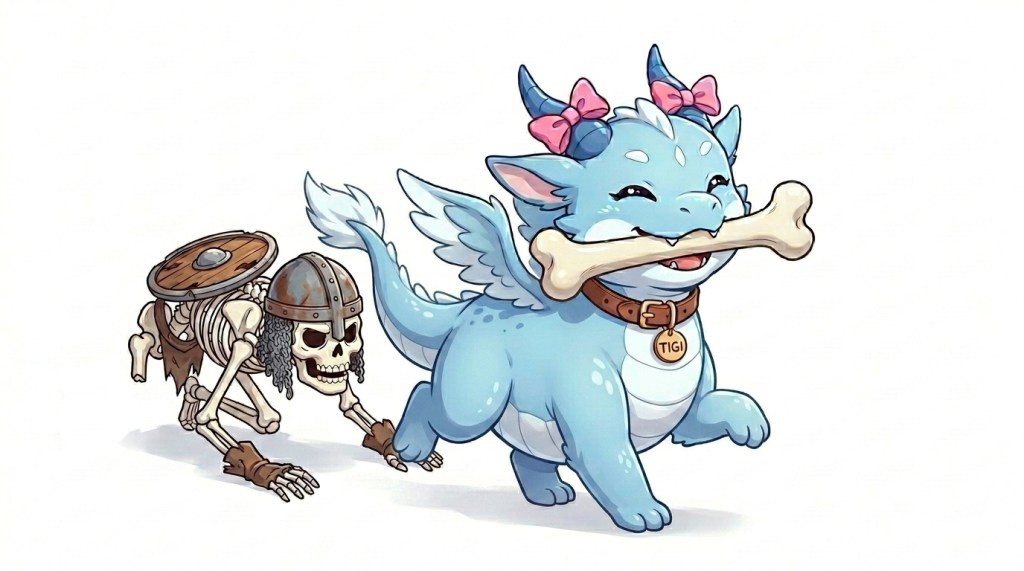
Tigi, the baby dragon, is not Bryreoss’s little sister, although Bryreoss could be excused for thinking that, since Tigi has almost identical coloration to his. Tigi is about 4 years old and has been living with her big brother for about 4 months. Despite the kobold minders’ best efforts, Tigi is still plenty wild.
She roams the dungeon freely and cheerfully, terrorizing the Ezuqirax operation by stealing shiny tools and snatching parts of his workforce. She calls the areas beyond the concealed doors her home.
If the players encounter her, she will usually react with excitement rather than fear.
Tigi is fascinated by humanoids and fears nothing unless directly harmed. She moves quickly through the dungeon, often appearing suddenly from hidden passages or small gaps in the stone.
She especially likes:
- shiny objects
- warm things
- interesting noises
- people who play with her
- stealing bones from skeletons
- sitting on sleeping creatures
If approached calmly, she behaves somewhere between a curious puppy, a raccoon, and a particularly destructive toddler.
She understands a few words of draconic and broken New Mountainheartian but is unable to speak.
Hazard die
The dungeon uses Nexropraxis ‘ hazard die system. Once every turn, the dm will roll a d6 and consult the following list
- Encounter
- Spoor (roll on the encounter table and describe the spoor on a 2 or 1 that is the next encounter)
- Shift (See examples below)
- Fatigue (take 1 damage unless the next turn is spent resting)
- Resource exhaustion (spell duration, etc)
- Light source exhaustion (any or all light sources go out)
Encounters
| d6 | encounter | Encounter Spoor |
| 1 | Ezuqirax and 4 skeletal bodyguards | Frustriation, orders, chants |
| 2 | 1d6 skeletons mining | Rattling bones, footprints, sound of rocks breaking |
| 3 | 1d6 kobolds | Whispers in the dark, clawed footprints, scurrying |
| 4 | 1d6 skeleton war party | Rattling bones, footprints, clinking metal |
| 5 | Malfunctioning illusions | Flashes of color, strange smells, strange sounds |
| 6 | Giant Vermin | Squeaks, scrabbling claws, sudden flashes of movement |
| 7 | Tigi playing | Small claw marks, nibble marks on random items, messes |
| 8 | Bryreoss and 1d6 kobolds | Tanturms, pleas, roars of anger |
Example shifts
One of the illusions hiding the secret doors fails for 1d4 turns.
- Ezuqirax gives 1d12 skeletons in the Skeletal Storeroom orders, and they head out to do them.
- The kobolds set up a simple trap in the part of the dungeon claimed by Ezuqirax.
- Unseen servants sweep through several rooms, restoring them to their initial condition.
- A disabled illusion trap or projector reactivates, showing a silent, repeating image.
- The skeletons in the Mine Face suddenly make progress or hit a problem while digging out the tunnel to the Sepulcher. Increase or decrease the time to clear by 1d4 hours.
- For 1d4 turns, all doors, including secret ones, switch. Illusions hide the normal doors, and the secret doors are shown.
Dungeon Rooms
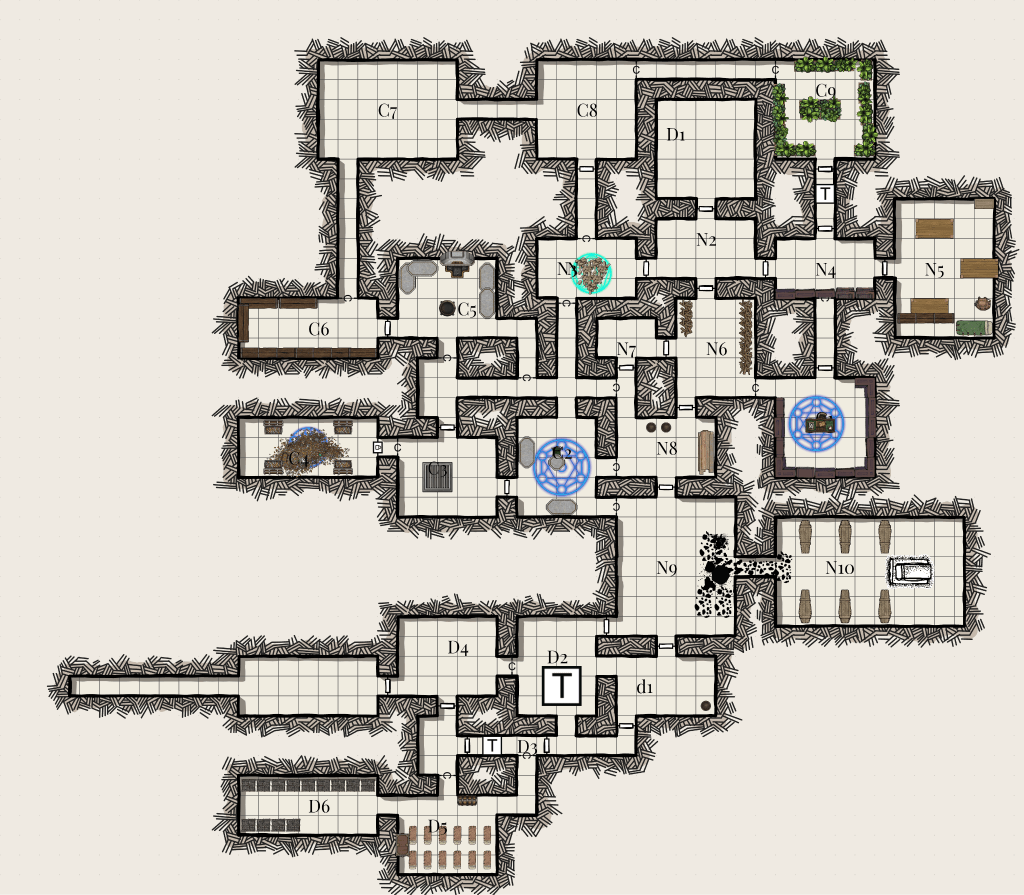
N1 Entrance
The shaft opens into a small chamber of impossibly smooth white stone. The walls are seamless, polished so perfectly they almost resemble glass. A large sign with glowing letters hangs above the sole door out of the room. Below the sign, a group of 8 skeletons armed with shields and longswords stands motionless, watching you silently. They appear tense, as if awaiting a signal or provocation before acting.
Sign: The sign reads in New Mountainheartian, “Danger: Excavation work beyond this point. Please go away and never come back.”
Skeletons: The skeletons do not attack immediately. They stand still, observing you closely for 30 seconds. If you attack them or attempt to pass through the door during this time, they respond aggressively and will attack. If left unprovoked for 30 seconds, they advance and attack.
Baby Dragon Snack: On round two of combat, a baby dragon with pink bows around her horns and a collar around her neck darts out and grabs a femur of the skeleton closest to the door before happily trotting back the way she came.
Door: The door leads to the Grim Crossroads
N2 Grim Crossroads
You enter a small rectangular room with doors in all four walls. From the south door, you can hear the faint sound of mining, the stench of death wafts from the east door, and the shifting of stones comes from the west door. There are many tracks in the dust covering the floor.
Tracks and Dust:
- The tracks are mostly skeletal feet, and they are obvious to anyone.
- If a player makes a know or craft check DC8, they determine that the dust is not the normal sort of dust typical of age and neglect, but stone dust, as if someone has been digging through the walls.
- If the players have come from the entrance and want to see where the baby dragon went, they will need to make a notice check, DC 7, to spot the tracks in the mess of skeletal footprints. The tracks lead through the hall to the east towards the skeletal storeroom.
Skeletal labor: Once every two turns, a procession of skeletons marches through the room, either from the south door to the west door with baskets of rubble to dump on the spoil pile and shuffle back to the mineface. They ignore the players unless attacked and are unarmed.
Doors:
- The north door leads to the Entrance.
- The east door leads to the skeletal storeroom.
- The West door leads to the Spoil Pile.
- The South door leads to the wrecked storeroom.
N3 Spoil pile
A massive mound of broken stone and shattered masonry rises almost to chest height in the room’s center. Pale dust coats the floor and hangs faintly in the air.
Faint markings are etched into the smooth stone floor beneath the rubble’s edge.
Rubble pile: A massive pile of fruit-sized debris stacked in the middle of the room.
- Anyone who has spent a prolonged period around mining operations recognizes that the rubble has been broken apart with sledgehammers.
- It will take about 3 turns to clear away the rubble.
Markings: The visible markings under the pile form an arch. The runic words for “seeming,” “delusion,” and “stupor” peek out from the rubble.
- Clearing the rubble reveals an incomplete spell inscribed in the floor, a large section worn away long ago.
- The spell was originally part of a magical working in this room. The work was a honey trap that created an extremely enticing illusion of a massive pile of treasure that fooled all 5 senses, combined with a very loud alarm spell.
- A DC 10 magic check lets a player character grasp the spell’s gist.
- With 4 turns and a full pattern, a Mage-class player can restore the spell.
Doors:
A concealed door set in the northern section of the north wall leads to Tigi’s Lair.
The door in the east wall leads to the Grim Crossroads.
N4 Skeletal Storeroom
The room is claustrophobically small. Rows of skeletons stand shoulder to shoulder, motionless as if awaiting orders. Shelves filled with boxes and bottles line the south wall. The floor is covered with many footprints. The scent of death and decay drifts from the door on the far side of the room.
Skeletons: The skeletons are freshly animated and awaiting orders. If a player character who is a necromancer uses the command dead spell on these blank skeletons, they make the save with a -2 penalty.
Supplies: The shelves contain baskets of bones, a box with 1d6 rations, stacks of cheap weapons and armor, various alchemical supplies, and several bottles of hand sanitizer.
Footprints: Most lead from the east to the west door and back. If the players make a DC 6 notice check, they notice a set of small 5-clawed footprints leading towards a spot on the north wall, then disappearing from view
Concealed doors: There are concealed doors on the north and south walls. She shelves block the southern entrances
Doors:
- The west door leads to the grim Crossroads
- The east door leads to the Necromancer’s lair
- The concealed door to the north leads to the Tigi’s Lair
- The concealed door to the south leads to the Enchanters Library
N5 Necromancer’s Lair
The room reeks of blood, old flesh, and sharp alchemical preservatives.
Several crude wooden slabs dominate the chamber, each holding bodies in various stages of dismemberment and flesh removal. Bone fragments and bloodstained tools litter the floor nearby.
An improvised camp occupies one corner of the room, while a makeshift desk of planks and sawhorses stands opposite it beneath piles of notes and books.
In the center of the chamber stands a mole pooka, clutching a wicked ritual knife and chanting over a corpse. He glances up at you with visible irritation.
“Oh great,” he sighs, rolling his eyes. “More distractions. Didn’t you read the sign?”
Slabs: The slabs contain recently deceased orcs midway through the process of flesh removal.
- Bulaka’s husband on the center slab
- The skeleton on the leftmost slab was interrupted midway through animation.
Camp: The camp consists of a single bed roll, a lantern, a portable camp stove, and a backpack.
- Inside the backpack are some cheap robes, 2 calixes of raise dead, a cheap pulp self-help book titled The Poor Wizard’s Guide to Impressing Women of High Breeding, and a zine titled Necromanitc Rituals Made Easy.
Desk: The desk consists of a few planks of wood nailed to crude sawhorses.
- On the desk is a spellbook bound in black leather and adorned with small animal-bone decorations, various writing implements, and notes translating another language into New Mountainheartian.
- The spellbook only has a few pages filled in, just some verses and a few level 1 cantos.
- Any mage, partial mage, or anyone who has skill points in magic recognizes the language being translated as the runic tongue of fairie.
- It is a description of Thaelir’s feats during the Second Age.
- Anyone who knows the runic tongue of fairie and can pass either a magic or a knowledge check, DC 12, realizes that the text is mistranslated in such a way that makes Thaelir seem like he is a necromancer.
Mole Pooka: The mole pooka is Ezuqirax the Dark, a self-taught necromancer and wannabe edgelord, real name Phil.
- Ezuqirax uses the stats for a Petty Mage (WWN p283)
- Ezuqirax, like most pooka, is polite and humble to a fault. His attempts at big bad necromancer speech are riddled with apologies and pleases that make him sound merely passive-aggressive.
- He alternates between trying to impress the PC’s and getting them to leave.
- If the players took Bulaka’s quest, he bluntly informs them that he does not care about the orcs one bit; they were merely in the way.
- He does not know the concealed passages.
- He is utterly convinced that Thaelir was a necromancer.
- Once it becomes clear that the players will not leave, he will offer them this deal. He grossly underestimated how long this expedition would take and is almost out of food. If the players can steal the orcs’ or the dragon’s supplies, he would be more than willing to split the treasure or return Bulaka’s husband.
- He will not mention that his target is Thaelir’s spellbook.
N6 Junk room
The chamber is cluttered with uneven heaps of wooden debris, rusted metal fragments, broken tools, and cracked glass piled haphazardly against the walls. Dust and splinters crunch underfoot.
From the southern doorway comes the steady echo of picks and shovels striking stone.
The piles are made up of rotten wood, corroded metal, and glass shards.
- The piles are all that remain of the original contents of the spoil room, the mine face, and the mine staging rooms.
- For each turn spent searching the piles, players have a 1 in 3 chance of finding one useful but mundane item. Examples include a length of rope, a structurally sound piece of wood, a handful of intact nails, or an empty bottle. Only one item may be found per turn spent digging.
Doors:
The north door leads to the Grim Crossroads.
The south Door leads to Mineface staging.
The concealed door in the east wall leads to the Enchanters Library.
The door in the west wall leads to the spare room.
N7 Water Closet
Unlike most of the rooms in the dungeon, this one has a door
The room shows evidence of being a bathroom. There is a stone commode and a stone basin. From the smell, it has been used quite recently.
There is nothing of interest in this room
N8 Mine Staging
The room looks like a storeroom. It is filled with the sort of equipment one would expect in a mine. There are lengths of lumber, a barrel of nails, large baskets, and picks and shovels. The sound of digging is stronger here than anywhere else in the dungeon you have visited so far.
Mining supplies: There are 5 coils of 50ft ropes, 6 large baskets, enough picks and shovels for 12 people, and about 150 feet worth of sturdy timber beams
Exits
- There is a concealed door in the west wall that leads to the Enchanters Kitchen.
- There is a door and a hall in the north wall; the hall leads to the spare room, and the door leads to the junk room.
- The door to the south opens onto the active mine face, where the digging grows louder.
N9 Mine face
The sound in this room is deafening, and the air is thick with stone dust. Twelve skeletons are actively digging through a large pile of rubble with picks and shovels, then dumping the debris into baskets. Five additional skeletons stand alert along the south wall, watching for any intruders.
Skeleton fighters: Unless the players approach them, they will not notice the skeletons, as they were ordered to watch the south door. They will attack the moment they notice the players.
Skeleton Miners: Focused entirely on digging out the passage, these skeletons ignore their surroundings and continue to excavate. They attack only if directly ordered by Ezuqirax.
- The skeletons have cleared enough of the passage for a small creature, such as a kobold or tigi, to crawl through. With another day’s work by these skeletons or a similar crew, a crawlspace could be created through the blockage.
- The skeletons are not smart enough to realize this, and at the pace they’re clearing the rubble, it will take at least 3 more days.
Exits:
- A hidden door in the south wall opens to the Enchanters Kitchen.
- The west door leads to the trap room.
- The excavated passage connects to the Sepulcher.
- The south door opens to the no man’s room.
- The north door leads to Mine Staging
N10 Sepulcher
The entrance to this room is blocked by an iron door with a sturdy lock.
The heavy air of the chamber smells of dust, dry stone, and faint animal musk.
Rough-cut walls surround rows of stone coffins lining the room, their surfaces thick with undisturbed dust. Each lid is carved in the likeness of an armored hobgoblin warrior.
At the far end of the chamber, atop a raised stone dais, rests a much larger coffin of polished black stone, glimmering faintly in the torchlight.
From within comes a slow, faint knocking sound.
When Aelthryn converted the tower, he ordered a crypt dug for himself. His interment was soon followed by the Civil War that destroyed his realm.
Ezuqirax naturally assumed that since this room was blocked off and none of the other rooms were the vault, by process of elimination, the treasure had to be here. He was wrong.
Stone Coffins: The coffins’ lids are sculpted to resemble hobogoblin fey knights. Each one is unique.
- Within each coffin is the skeleton of a hobgoblin, a set of mundane bronze plate armor, a bronze sword, and a selection of grave goods worth 1d4 guildenmarks, all in good condition.
King’s Coffin: At the back, a larger coffin of polished black stone, lid carved as an armored hobgoblin king, emits faint knocking from within.
- Burial in a wizard’s tower transformed King Aelthryn into a ghoul, ravenous after a millennium. Opening the coffin makes him attack, hungry for flesh.
- Within the King’s coffin lies 100 guildenmarks’ worth of regalia, and King Aelthryn the ghoul is clad in his unique +1 weightless bronze plate armor.
D1 Burned Storeroom
The chamber is a blackened ruin.
Charred bones, melted weapons, shattered shelves, and rotting corpses litter the floor amid soot and ash—the air reeks of burned flesh and old death.
In one corner sits a lone barrel, its lid still firmly in place.
Carnage: Everything is as it seems, dead kobolds and destroyed skeletons
Barrel: A medium barrel with a lid; the word NAILS is stenciled on the side in New Mountainheartian.
- A kobold, armed with a stiletto and clutching a whistle, waits inside the barrel—ready to act at the slightest disturbance.
- If players open the barrel, the kobold lunges, stabbing with its dagger before leaping out, whistle blaring as it flees with the barrel.
- If the kobold sounds the alarm, kobolds in the Dragon’s chamber and Barracks hurry to arms, preparing for battle.
- If players open the barrel, the kobold lunges, stabbing with its dagger before leaping out, whistle blaring as it flees with the barrel.
Exits:
The door in the north wall leads to the Mine Face.
The door in the south wall leads to the trapped corridor.
The door in the west wall leads to the Kobold Trap room.
D2 Kobold trap room
The chamber beyond is dim and cluttered with shadows. The walls are covered in layers of overlapping graffiti scrawled in different hands and different languages, making the writing nearly impossible to follow.
Something about the room feels oddly still.
Graffiti: The walls are scrawled with crude drawings, insults, warnings, and rough maps. Phrases in New Mountainheartian and various local English dialects overlap chaotically. The writing styles range from clawed scratches to quick, shaky script, making it difficult to separate one message from another.
- Hidden in the graffiti is a kobold-made magic circle. Its spell creates a magnetic field strong enough to pull a man off his feet. Iron or steel entering the room is drawn to the magnet and stuck, needing at least three people to pull it off.
- Spotting the magic circle requires a DC 8 notice check. Success also reveals bits of metal stuck to the wall by the doors.
- The magic circle can be disrupted by painting over or defacing any rune.
Hidden kobold: A kobold hides under a grey cloth in the far corner. His orders are to blow a brass whistle if anyone enters and get their weapons stuck to the wall. If he blows the whistle, a squad of kobolds will rush in to overwhelm the players.
Exits
- The east door leads to the Burned Storeroom.
- The south door leads to the trapped hall.
- The west wall has a concealed door that leads to the Dragon’s Camp.
D3 Trapped Corridor
The corridor is unnaturally clean. Small clay lanterns with glowing fungus are spaced along the walls.
The floor is spotless except for a writing-covered circle halfway down the hall. A similar circle marks the far wall.
Halfway down the corridor hangs a painted wooden sign reading:
“NO SKELETONS ALLOWED.”
The kobolds rigged a set of magic circles in the corridor—one on the far wall, one covering the floor midway down the passage.
- When a creature steps on the circle on the floor, it triggers the trap triggers: a powerful wave of force erupts from the circle on the wall. Any creature in the hall must make a body save or be thrown back against the wall and take 1d4 damage.
- Change the markings on either circle to deactivate the trap.
- Alternatively, a creature can leap over the floor circle with a good running start.
D4 Dragon’s Camp
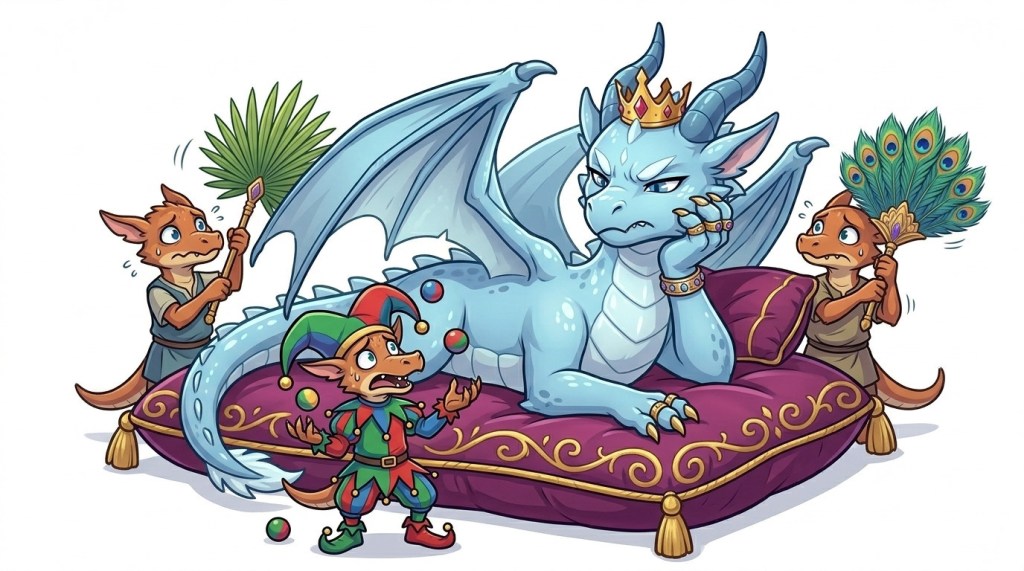
The brightly lit room is filled with sweet scents. On a field of colorful, plump cushions sits a blue-and-white dragon. He scowls at a frolicking kobold jester while two more fan him with large paper devices. As you enter, he scoffs and theatrically proclaims, “Who dares intrude upon mine camp? Dost thou not knowth that I am Bryreoss, son of Tighyn, Queen of Yotrar and despoiler of Bredon?”
Anyone with at least one point in know recalls Tighyn rules a small mountain kingdom northwest of Lyonesse.
Bryreoss speaks like a spoiled 8-year-old prince, using Middle English with a slight British accent.
- He often mangles impressive-sounding words.
- He is an unabashed mama’s boy, fiercely intolerant of anyone who disparages his mother.
- If the players show humility and reverence, Bryreoss offers a quest. He explains that Thaelir, before perishing in the second age, created a magical crystal orb capable of casting lifelike illusions across the entire barony. Bryreoss covets the orb as a birthday gift for his mother. His kobold servants have scoured the dungeon and tower, but uncovered nothing. Bryreoss notes the necromancer suspects a vault lies behind a blocked passage, but he is uncertain. The kobolds have discovered one hidden passage and suspect others remain. Bryreoss tasks the players with retrieving the orb, offering anything else they find—including the entire dungeon—as recompense. He warns that betrayal will be met with lethal force.
- He also asks the players to keep an eye out for his baby sister, Tigi. She has been running circles around her kobold minders and the dungeon. Mother will be mad if anything happens to her.
Kobolds: Browbeaten, polite to fault, humble, they hit the deck when Bryreoss speaks.
- They can explain how the concealed doors work, having found a few in their camp, and point out the concealed doors between the camp and the trap room, and between the barracks and their pantry.
- They can give the players a mostly accurate account of this place’s background.
- They can inform the players that Tighyn’s birthday will be in 7 days and that it will take the master at least 3 days to get back home, assuming he leaves the kobolds and Tigi behind.
Treasure: Bryreoss brought his entire hoard with him for emotional support, and it surrounds him on his pillow. It mostly consists of toys, a tin regalia, and a smattering of 20 gold coins of unknown origin.
D5 Kobold barracks
The room smells of roasting game and filth. Two dozen or so bedrolls are lining the walls, each one with its own little backpack. There is a much larger pile of luggage by the wall and a smoky cookfire with two kobolds basting a rabbit and a few more lounging about.
Backpacks: The backpacks contain basic camping gear scaled for use by kobolds
Several of the backpacks appeared to have been chewed open.
Luggage: The luggage is mostly empty but smells nice, like the Bryreoss’s room
- Anyone who inspects all the luggage will find, tucked behind the other suitcases, a bottomless steamer trunk buried beneath a layer of empty crates and perfumed linen.
Kobolds: There are 6 kobold warriors in this room
- Unless word spreads that the player characters are not hostile, the kobolds will immediately run to get reinforcements.
Exits:
- The north exit leads to the trapped corridor.
- The west entrance leads to the Dragon’s Pantry.
- The east exit leads to the Burnt Storeroom.
D6 Dragon’s Pantry
You are hit by a wave of frightened chittering and noisesome air the moment you enter the room. Crude wooden cages line the woods, holding woodland creatures. Along the other wall are racks made of sticks, from which skinned carcasses of creatures hang.
Cages: There are roughly 2d12+4 woodland creatures in the cages
Racks: There are enough small game on the racks to feed a person for a week
C1 Enchanter’s Library
Entering the room feels like stepping into a new world. The space is pristine, dust-free, and the air is sweet. Glowing circles of runes cover the floor, and books fill shelves on all four walls. A large writing desk supports a massive tome.
Circles of runes: Four concentric rings of runes glow softly with blue light, arranged on the floor.
- A mage, or anyone with training in magic, can recognize the rings as spells that empower an ongoing magical working.
- There are four distinct magical workings present in the room.
- The first wards the room against dust.
- The second stymies the advance of decay
- The third regulates the hamber’s climate.r.
- The fourth ward against vermin.
- There are four distinct magical workings present in the room.
Shelves: The shelves are packed with leather-bound books from floor to ceiling.
- The books are written in the runic tongue of faerie and date from the First and Second Ages. Each page is inscribed in a spiraling script.
- The specific dialect of the runic tongue of Faerie used in these books differs significantly from the version employed in spellcasting. This difference is enough to make reading the texts difficult, even for skilled mages. A DC 11 know check, or a magic check, enables the reader to understand the general meaning.
- The books are a mix of histories of the first and second ages, dossiers written by Thaelir about his various local tormentors, and various books on magical theory.
- These books are priceless to scholars, and the library could fetch a fortune in a major city like Sliberberg
- The players cannot determine this, though, without getting the collection appraised
- These books are priceless to scholars, and the library could fetch a fortune in a major city like Sliberberg
Desk: A massive oak desk stands at the center. A large leather-bound tome rests on the corner, and several scrolls are on the blotter.
- The book is one of Thaelir’s spellbooks, filled with every illusion-crafting spell ever devised. It contains animated three-dimensional illustrations and intricate examples of magical calligraphy.
- If the players give this book to Ezuqirax the Dark, he will thank the players and depart, saying that everything else in the dungeon is theirs to keep
- Keeping the book causes problems. Second Age spellbooks are extremely rare and highly sought after by wizards.
- The desk drawers are full of preserved stationery: golden pens, expensive ink, and gold-trimmed paper, worth 20gm to the right buyer.
- The scrolls are a calyx of Damnation of the Senses and a half-completed calyx of Phantasmal Mimesis.
Doors: The door in the north wall leads to the Skeletal Storage. The door in the west wall leads to the junk room.
C2 Enchanteres Kitchen
The moment you step through the hidden doorway, the smell hits you: fresh bread, ripe fruit, rich stew, roasted nuts, and sweet pastries all mingling together in warm air.
Smooth stone countertops wrap around the chamber. Embedded within them are large stone bowls piled high with immaculate food untouched by age or rot. In three corners of the room, broad stone basins filled with different liquids sit, each faintly steaming or glimmering in the light.
Several softly glowing rings of runes circle the floor around a heavy stone dining table set neatly for a single diner.
Bowls of Food: The bowls are embedded in the countertops
- Each bowl has a magic that produces blocks of rich, filling, yet bland-tasting food paste shaped like bread, vegetables, and fruit.
- Due to the magic at work in this room, they smell and taste like the food the blocks are shaped like. The texture, however, is subtly off.
Basin: Each stone basin is enchanted to remain filled with its specific liquid.
- The northeastern corner is filled with pure ethanol.
- The northwest corner is filled with distilled water.
- The southwest corner is filled with a hot solution of pure caffeine.
Cabinet: The cabinet holds 5 stone plates, 6 brass cups, several measuring cups, and flatware for 6.
- Anyone inspecting the cups notices a ring of runes, indicating an enchantment.
- If a player makes a magic DC 6 check, they recognize the spell as one to change the flavor and texture of a liquid to one’s perception. It’s a pretty common enchantment in Sliberberg, but each cup is still worth 1gm.
- The plates are stone with runes that give extra protection against breaking.
- If a player makes a magic DC 6 check, they recognize the spell as one to prevent fracturing or chipping. Each plate is worth 1gm to a merchant in Sliberberg.
- The flatware is simple and enchanted for durability, and is worth 50m total.
- Measuring cups have runes that allow them to measure liquids with magical precision.
- If a player makes a magic DC 10 check, they determine that the spell is meant to measure out very precise amounts of liquid.
- Thaelir’s unseen servants used these cups to make various “beverages” using the liquid in the three basins.
Rings of runes: These link to all the magical workings described above, empowering the room’s multiple magical effects.
Table: The table is large enough for 5, but is currently set for 1.
- Anyone who inspects the table thoroughly determines that it was well used; there is a small groove dug into the floor and the edge of the table.
C3 The Wyrd Rift
A massive rift occupies the center of the room with a massive grate covering it. Metal railings and a sign surround it. Tiny crystals are growing on the rails and the grate.
The WMI in this room is 3.2 “normal” levels are between 1 and 1.5
Grate and Railings; Black metal with a thin speckling of rust, they throw off an occasional spark of magic
- The metal for the railing and grate is cold iron; any character with a metalurgist’s background can identify it almost immediately
- Any fey who touches the stuff takes 1 point of damage
- The grate can be removed with a DC 8 strength check or with about an hour of work with ropes, pulleys, and crowbars
Rift: The rift seems to plunge deep into the earth and is alight with strange shifting colors
- Wyrd is flowing out from the rift and decaying on the grate
- Removing the grate will cause the WMI in the room and all the surrounding rooms to spike to 5, and the rest of the dungeon to have a WMI of 3
Sign: A sign in the runic tongue of Faerie.
- The sign reads.:
To all concerned
A leak of corrupted aether has emerged from the substrata beneath this chamber. A cold-iron containment grate has been installed until my return from the Court of Summer.
Do not remove the grate.
Do not touch the grate.
Do not stand on the grate.
If the grate has already been removed, please replace it immediately.
— Thaelir Moonspire
Crystals: The crystals are tiny shards of possibillium, too small to harvest at the moment. Sharp enough to cut unwary hands, dealing 1 damage.
C4 Vault
The door to this room is made of solid bronze and has a very complicated enchanted lock. A magic DC 12 check or craft DC 14 check is required to unlock it quickly. Alternatively, a player character working with an arcanist’s or a thief’s tool can unlock the vault in a couple of hours of fiddling.
The instant the vault door swings open, brilliant white lights flare to life overhead.
A mountain of glittering coins and jewels dominates the center of the chamber, throwing back dazzling reflections in every direction. Gold spills across the floor in shimmering heaps while gemstones glitter like scattered stars.
Along the walls stand heavy stone chests banded in bronze, their lids hanging open.
Upon a raised stone plinth near the back of the chamber, a crystal orb swirls faintly with shifting colors. Beside it sits a strange brass device of gears, counters, and chutes.
Pile of gold coins and jewels: A dazzling heap of treasure stretches roughly 10 feet by 11 feet by 4 feet, piled high in radiance.
- The treasure is an illusion that serves as bait for a trap.
- When somebody touches the illusory riches, they are forced into a position of prostration. Then an illusory voice says in ancient Faerie, “Foolish thief, I am Thaelir, master of the seeming, and you will learn humility.
- The person caught by the trap will remain prostrate until they kiss a foot or are dragged out of the area of the pile.
Chests: The chests are opened, untrapped, and filled with gold coins
- In truth, the chests contain only copper coins, enchanted to deceive thieves into taking little of value.
- Thaelir made a point of paying in copper coins to make every unavoidable interaction as unpleasant as possible.
- Across all the chests, roughly 400 gold marks’ worth of copper coins glimmer, totaling 4,000,000 pieces.
Crystal Orb: The orb is one of a set of Orbs of Illusionary Armies created by Thaelir and is the treasure that Bryreoss seeks
Counting Machine: The machine consists of a brass box with a hopper, a chute, and a set of counters.
- The strange machine is an automatic coin counter and bagger. Dump any amount of coins into the machine’s hopper, and it will automatically count and bag them for easy use.
C5 Enchanters workshop
Brilliant white light floods the chamber, reflecting sharply off polished stone counters crowded with delicate tools, strange glassware, scattered papers, and half-finished projects.
Cabinets line the walls beside racks of crystal rods, metal implements, and oddly shaped vessels. In one corner, a massive glowing crystal shard rests beside a small bowl and fine metal files. Opposite it, a squat furnace radiates steady heat despite containing no visible fire.
At the center of the room stands an enormous bronze cauldron etched with glowing runes, its contents slowly stirring, making soft bubbling sounds.
Tools: The counters showcase a full set of alchemists’ and artificers’ tools. Skilled hands would recognize the gleaming runes engraved on glassware and metal alike—pristine, the marks of a master far surpassing modern craft.
- The workshop can be used to craft magic items in ¾ of the time and ¾ of the expense.
Cabinets: Mostly contain more tools, plus some unworked crystal and glass.
Crystal: A large shard of crystal with a small bowl and file set next to it. One side seems a little worn down compared to the other.
- The crystal is a single large piece of possibilinite, crystalline aether, and a superior material for crafting magic tools and potions.
- The crystal is worth 300gp to an artificer or an alchemist.
Furnace: the furnace glows softly within, even though you cannot hear a fire.
- The furnace is powered by magic and has a heat-runic circle set into its roof.
Notes: There are pieces of paper with writing on the floors and the countertops
- Anyone who can read the runic tongue of faerie learns that these are recipes for various magic consumables. The recipes include
- A Hand of Glory: right hand of a thief + Gorgon eye extract + wax
- Perfume of attraction: Smiles of a queen + crystalline dreams+Rose fragrance
- Ultimate love potion: memory of a first kiss + feathers from an angel’s wing + treant’s heart
- Between formulas linger the scrawls of doubt and longing: notes to self, ink trembling with Thaelir’s secret hopes, schemes of slipping into Princess Caoilfhionn’s tower for some stolen happiness.
Cauldron: An immense bronze vessel, every inch carved with glowing runes. Its contents send up gentle steam, swirling as though stirred by unseen hands.
- It is a self-stirring, self-heating, voice-controlled cauldron.
- It announces loudly when it reaches the requested temperature or stirring speed.
C6 Supply room
Shelves upon shelves loom out of the darkness as pale lights flicker reluctantly to life overhead.
In the air hangs the scent of stale dust, dried herbs, spilled chemicals, and the sour tang of ancient rot. Across the dim room, boxes, bottles, clay jars, stoppered flasks, and strange metal canisters crowd every available surface, many collapsed with age or leaking long-dried residue down the shelves.
Neat labels in the Runic Tongue of Faerie adorn every container.
On each bottle, jug, box, and jar, labels written in The Runic Tongue of Faerie state their contents—a regent or ingredient for alchemy or artifice.
Most of the supplies have spoiled. The following is a list of exactly 8 bottles, jars, and boxes that remain.
- Assorted dreams caught in crystal.
- The right hand of a thief
- Pickled Gorgon eyes
- A bottled lightning bolt
- A treant’s heart
- Feathers from the wings of an angel
- Laughter of a giant
- The smiles of a Queen
- The memory of a first kiss
C7 Hall of Seemings
The room is bare, exceptionally so, stark white walls, stark white floor. The only thing in the room is a device in the southeastern corner.
The room was once a testing facility for illusions and illusion-projection tools.
Device: The device is made of bronze and has several colorful buttons and a dial. It is firmly affixed to the floor.
- The device is an illusion projector that can display up to 8 illusions with sound at the press of a button. The player can figure out how it works by fiddling with the device for ten minutes.
- The device has the following illusions loaded
- A very angry adult dragon
- The beaches of Caerwaul Island
- A breathtakingly lifelike image of a beautiful Sidhe princess in ancient garb, 18 fey years old
- A platoon of centaur lancers is charging.
- Thaelir himself, casting a spell, each time the illusion plays is a different combat spell.
- The device can be opened up with a tinker’s tools in about 5 minutes.
- The insides contain 5 relic disk inscribed with runes (one for each illusion), three empty slots, and a possibillium crystal worth 10gp
- Removing the crystal permanently turns off the device
- The insides contain 5 relic disk inscribed with runes (one for each illusion), three empty slots, and a possibillium crystal worth 10gp
- The device has the following illusions loaded
C8 Map room
The floor of the room is one massive mural depicting a landscape seen from high above. Above the map is a large bronze bell. Along the north wall are shelves upon shelves of jars
The room served as an early-warning system for Thaelir, allowing him to deploy personalized unpleasantness to drive away the people who most frequently came to his tower.
Map: A strikingly detailed map, every city, town, and mountain is rendered in extraordinary detail
- To the average viewer, the map shows a place that either does not exist or is very far away. A character that makes a DC 12 knowledge check will recognize the map as being one of the Silver Highlands and the northern part of the Slanach lowlands during the Second Age.
- The map shows some curious features of the geography of the second age.
- Where New Mountainheart is today was a fjord
- There is no sign of the moon mounts. Instead, that region is a vast plain
- Most of the land surrounding the tower was much flatter than today.
- The map also contains dozens of labeled towns and villages that are no longer there. One of them is a previously unknown (to the people of the third age) city named Vireldane, which is 20 miles northeast of the tower in the forest of Gloamwood.
- The map shows some curious features of the geography of the second age.
Bell: A large bell covered in tiny runes
- When rung, a deafening toll is heard throughout the dungeon and tower.
Bottles: Hundreds of tiny bottles, each containing a bit of hair, a fingernail, or some desiccated blood. They are each labeled with runes.
- The labels are various nobles and royals from the second age; many are mentioned in Thealeir’s diaries as recurring nuisances and frequent visitors.
- If the players place a bit of a living person(nail, blood, hair) inside one of the bottles, the person’s exact position will appear on the map as a glowing, colored dot, and the bottle will pulse softly in the same color. The magic of the map and bottles only works for living people and tracks them only within the confines of the territory depicted on the map.
- If a tracked person is within 10 miles of the tower, the bell will start to ring nonstop.
C9 Tigi’s lair
Soft multicolored light fills the chamber from dozens of glowing orbs nestled among dense vegetation.
Flowering vines, broad-leafed plants, and colorful fruit shrubs cover the walls and ceiling, filling the air with the scent of earth, fresh leaves, and sweet blossoms.
Only one small gap in the overgrown foliage remains uncovered in the far corner of the room.
Vegetation: Abundant plant life grows from several stone beds embedded in the floor.
- Anyone who takes the time to clear away the vegetation from a stone bed will reveal a line of runes running along its edges.
- A DC 9 magic check reveals that the spell the runes are part of continuously refreshes the garden planters.
- Anyone who makes a DC 10 Survival or Knowledge check learns that many of the plants are types not seen for thousands of years, though it is impossible to tell how valuable they could be without further study.
Burrow: Through this gap in the vegetation, there is a little burrow lined with shiny bits and scraps of paper and cloth.
- There is a 1-in-3 chance that Tigi is sleeping in the burrow.
- Among Tigi’s treasures are 4gm in coins, shiny bones, pebbles, and a spare robe of Ezuqirax.
Epilouge
The Empty Vault
If the excavation finishes before Ezuqirax obtains the Grimoire, he finds the so-called vault is actually a tomb holding a ghoul too powerful for him to command.
The resulting disaster devastates much of his remaining workforce, forcing the necromancer to flee the dungeon in panic and humiliation.
In his haste, Ezuqirax abandons tools, supplies, notes, several idle animated skeletons, and one confused skeleton still digging at the collapsed tunnel days later.
Ezuqirax The Illusionist
If Ezuqirax obtains the Grimoire, he thanks the players matter-of-factly and declares the dungeon theirs to do with as they please. He and his skeleton army depart in a grand procession, never to be seen again by the players.
Weeks later, rumors reach Paxton’s Crossing of strange occurrences on the road back to Sliberberg: towns beset by phantom armies, troublesome sprites, and other phantasms. Ezuqirax remains convinced the spellbook holds necromancy spells and blames only his miscasting for the chaotic results.
A Son’s Gift
When Bryreoss finds the Orb of Illusionary Armies, he leaves at once to present it as a birthday gift to his mother, his tired kobold retainers following. The gift gives Bryreoss several months as his mother’s favorite. Soon, rumors spread of phantom palaces and dragon battles in the sky.
If the players encounter Bryreoss again, he will magnanimously offer them a favor.
Little Dragon Lost
If Tigi is not returned to Bryreoss’s camp, she is left behind by the kobolds as they hurry home. They mean to come back for her, but never do. She builds her own lair in the dungeon and sometimes plays with Ashmaw children or the players, if they claim the dungeon. She’s exposed to enough people to grow into a thinking but wild dragon.
The Grim Winter
Upon the defeat or departure of Bryreoss and Ezuqirax, the Ashmaws emerge from their cramped camp to rebuild. The coming winter will be hard, with many warriors dead or maimed, but for the first time in weeks, the tribe has a chance of survival.
During winter, one orc child discovers hidden doors in the dungeon and the Enchanter’s Kitchen—if the players haven’t claimed the tower.
The New Masters of Caer Aelthryn
Though Caer Aelthryn is now a ruined shell, it remains highly defensible and desirable, situated between the impenetrable thicket and many magical devices hidden in its dungeons. If the players claim the castle, they could restore it to its former glory within a year and at a cost of about 500 guildenmark.
A Treasure Trove of Maps and Knowledge
If the players find the library or Thaelir’s scrying chair atop the tower, they discover dozens of Second Age sites across the Silver Highlands. Many belonged to Thaelir’s rivals and enemies; some are within a few days’ trek from Paxton’s Crossing, all untouched since the Second Age. Especially, it draws the interest of scholars from Sliberberg, and wizards flock to Paxton’s Crossing by the dozen, eager to examine the players’ new trove of books.
Regardless
Word spreads quickly about the players’ delve into Caer Aelthryn. If the players do not claim the dungeon, a multitude of adventurers descend upon Paxton’s Crossing, seeking their own fortunes in the ruins. Most return with little more than scrapes and bruises.
Appendix: Monsters
| HD | AC | ATk | DMG | SHOCK | move | ML | Inst | skill | save | |
| The ghoul that wasKing Aelthryn* | 5 | 16 | +6 | 1D8+2 | 2/15 | 30 | 9 | 4 | +1 | 13 |
| Bulaka Swordfist* | 4 | 18a | +6 | d12+2 | 2/AC15 | 30 | 10 | 5 | +2 | 14+ |
| Bryreoss b* | 4 | 16 | +5 | 1d6+1 | 2/AC15 | 30F | 9 | 4 | +1 | 13+ |
| Ezuqirax * | 3 | 12 | +1 | 1d4 | 1/15 | 30 | 8 | 4 | +1` | 14+ |
| Giant Rats | 2 | 10 | +2 | 1d4 | – | 30 | 6 | 6 | +0 | 15+ |
| Kobold retainer | 1 | 12 | +1 | wpn | wpn | 30 | 7 | 5 | +0 | 15+ |
| Orc commoner | 1/2 | 10 | +0 | wpn | wpn | 30 | 7 | 5 | +1 | 15+ |
| Orc Warrior | 1 | 14a | +2 | wpn+1 | wpn+1 | 30 | 8 | 5 | +1 | 15+ |
| Skeletal warrior | 1 | 14as | +2 | 1d8 | 2/AC13 | 30 | 12 | 5 | +1 | 15+ |
| Skeletal worker n | 1 | 13 | +1 | 1d6 | – | 30 | `1 | 5 | +0 | 15+ |
| Tigi bn | 2 | 14 | +2 | 1d4 | 1/AC13 | 30 | 8 | 7 | +0 | 15+ |
| Water Elemental | 3 | 15 | +3 | 1d6 | 2/Ac15 | 30S WIM | 12 | 3 | +1 | 13+ |
a: AC as per usual armor, B has a breath weapon, s: normally carries a shield, *: has a special combat ability, n: noncombatant unless directly attacked
1/2 of the kobold retainers wield spears, the rest wield crossbows
All orc warriors have a greatsword and 1d6 javelins
Skeltal warrior wield longswords
Breath Weapon
Bryreoss
Once per scene, Bryreoss may exhale a line of crackling blue-white flame 30 feet long and 5 feet wide. All creatures in the area take 2d6 damage, save for half.
Tigi
Once per scene, Tigi may exhale a puff of sparkling frost in a 10-foot cone. Creatures within the area take 1d4 damage and must make a Physical save or have their movement halved for one round.
Special Combat Ability
Bryreoss
Bryreoss ignores Shock from nonmagical weapons
Ezuqirax
Ezuqirax knows the following arts and spells as a third-level necromancer
Spells
- Command the Dead
- Query the skull
- The Coruscating Coffin
- Raise Corpse
Arts
- Bonetalker
- Consume Life Energy:
He also possesses a whistle that, when blown, summons all his skeletons to his location to defend him
King Aelthryn
Ghoul Paralysis
Any living creature hit by King Aelthryn’s claws or bite must make a Physical save or become paralyzed for 2 rounds.
Bulaka Swordfist — Iron Hook
Bulaka’s prosthetic hand is fitted with brutal locking clamps and hidden hooks.
Once per round, when Bulaka hits a target with a melee attack, she may immediately attempt to grapple them as an On Turn action. Grappled enemies cannot disengage from her without winning an opposed Punch or Exert check.
